Drawing Setup in AutoCAD 2011
Sabtu, 02 Maret 2013
1
komentar
In this tutorial, you learn how to start a drawing using a drawing template file. When you use a template file, new drawings created from the template automatically use the settings defined in the template. This saves you setup time and helps to make sure each drawing you create follows your company’s CAD standards.
Drawing template files have a .dwt file extension
Some of the settings stored in drawing template files include
■ Unit type and scale (precision)■ Title blocks/borders, blocks, and logos
■ Layer names
■ Snap, grid, and ortho settings
■ Grid limits
■ Annotation styles
■ Linetypes
To start a drawing with a template
- Click Start menu (Windows) ➤ (All) Programs ➤ Autodesk ➤ AutoCAD 2011 ➤ AutoCAD 2011 - English.
- NOTE Close the Welcome Screen, if displayed. The AutoCAD window opens with an empty drawing file Drawing1.dwg.
- Click ➤ New.

- In the Select Template dialog box, select Tutorial-iArch.dwt.
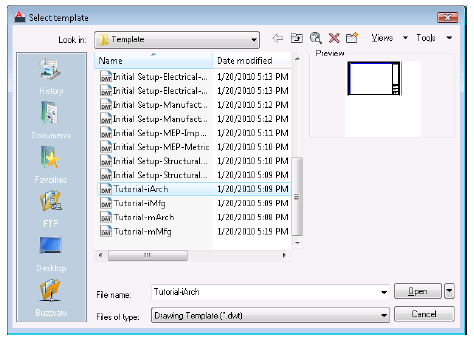
- Click Open to open the Tutorial-iArch.dwt template.

Notice that the file name is Drawing2.dwg. You are not opening the Tutorial-iArch.dwt file template file, but are opening a new drawing based on the template file. The Tutorial-iArch.dwt template file is used for architectural drawings, and includes predefined settings for drawing units, dimension style, linetype, layer, border and title block. When you use a template file, you can start your drawing immediately without having to spend time defining settings and styles.
- Click ➤ Close ➤ Current Drawing to close Drawing2.dwg.
Switch Workspaces
The workspace is the AutoCAD window layout of dockable windows, menus, toolbars, and other user interface features. You can select a predefined workspace or define your own. In this lesson, you learn how to select the predefined workspaces, including the workspace for creating a 3D model.
When you use a workspace, only the menus, toolbars, ribbon tabs, and palettes relevant to a task are displayed.
To switch workspaces
- The status bar is located at the bottom of the window. The Workspaces icon on the status bar is shown below.
NOTE If you do not see this icon, right-click in an empty area on the status bar and click Workspaces. If you still do not see this icon, you may need to maximize the AutoCAD window.
- Click the down arrow to display the menu of predefined workspaces.
- On the Workspace menu, click 3D Modeling

- The 3D Modeling workspace is displayed. The Workspaces icon in the status bar indicates that you are now in the 3D Modeling workspace. In this workspace, you can access the various commands and tools needed for creating 3D drawings. For example, notice the 3D modeling commands available in the ribbon.
NOTE The selected workspace is retained when you close and reopen AutoCAD. To return to 2D Drafting & Annotation, you must select it.

- To access help information for the Ribbon commands, place the mouse cursor over one of the commands and keep the cursor there for a second. Help information for the Smooth Object command is shown below.

- Use the Workspaces icon on the status bar to switch back to the 2D Drafting & Annotation workspace.
TERIMA KASIH ATAS KUNJUNGAN SAUDARA
Judul: Drawing Setup in AutoCAD 2011
Ditulis oleh Iyan Supriyadi
Rating Blog 5 dari 5
Semoga artikel ini bermanfaat bagi saudara. Jika ingin mengutip, baik itu sebagian atau keseluruhan dari isi artikel ini harap menyertakan link dofollow ke https://teknikautocad.blogspot.com/2013/03/drawing-setup-in-autocad-2011.html. Terima kasih sudah singgah membaca artikel ini.Ditulis oleh Iyan Supriyadi
Rating Blog 5 dari 5
Categories:
Tutorial


1 komentar:
minta tlg dong.. cara konvert autocad 3d ke 2d, caranya gmn? tanks masukannya
Posting Komentar