Getting Started with the Basics in AutoCAD
Jumat, 01 Maret 2013
0
komentar
- To open AutoCAD, click Start menu (Windows) ➤ (All) Programs ➤ Autodesk ➤ AutoCAD 2011 ➤ AutoCAD 2011- English. NOTE Close the Welcome Screen, if displayed. The AutoCAD window opens with an empty drawing file named Drawing1.dwg.
- Before moving on to the next lesson, become familiar with the areas of the AutoCAD window labeled below.

Undo - How to start over
If you are stuck, and want to start a lesson over, you can use the Undo command. Click the Undo icon on the Quick Access toolbar, which is located at the top of the window. You may need to click it a few times to undo all previous commands
If you accidentally click in the drawing area, display a shortcut menu, or start a command, you can always escape by pressing the Esc key on your keyboard.

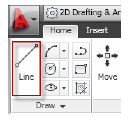
On the ribbon, click Home tab ➤ Draw panel ➤ Line.
- Drag the mouse down to the empty drawing. A crosshairs cursor appears with three text boxes. The “Specify first point” box is called the dynamic prompt. With the dynamic prompt, you can keep your eyes on your work and do not have to look down to the command line.
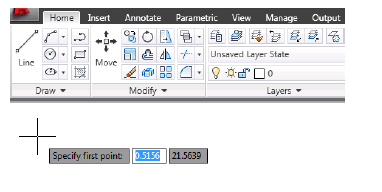
- The other two text boxes show the location (x and y coordinates) of the cursor. Use the mouse to move the cursor around and notice that the coordinates change.
- In the empty drawing, click the mouse to pick a start point for your first line. The dynamic prompt changes to “Specify next point or”.

- Drag the cursor in any direction and click to pick the end point of your line. Other text boxes appear with additional information about the line. You can ignore these for now.
- Press the Enter key on your keyboard to end the line. You have drawn your first line!

Before you learn how to draw a series of lines, select and delete the line you just drew.
- Move the cursor over the line to highlight it; the line will appear darker and dotted.
- Click the mouse to select the line. You know it is selected when three square selection handles appear and the line changes to a dotted line.

- Press the Delete key on your keyboard to erase the line. You have learned how to select a single object and delete it.
To draw a series of connected lines
- On the ribbon, click Home tab ➤ Draw panel ➤ Line.
- Drag the mouse down to the empty drawing. Click to specify the first point for the line.
- Drag the cursor in any direction and click to pick the next point of your line. You have drawn the first line in a series of connected lines.
- Drag the mouse and click to specify the next point. You have drawn the second line in a series of connected lines.

- Continue to drag the mouse and click to specify points to add more lines.
- When you want to end the series of lines, press the Enter key on your keyboard.
To select and delete a series of lines
Before you learn how to connect a series of lines to create an object, delete the lines that you just drew. In the steps below, you will use a window selection box to select all of the lines at the same time.
- Move the cursor above and to the left of the lines.
- Click and hold down the mouse button as you drag to the right and down to form a selection box around the lines.

- Click when all of the lines are inside the box. After you click, the square selection handles appear and the lines become dotted.

- Press the Delete key on your keyboard to erase the lines.
To connect a series of lines to form an object
- On the ribbon, click Home tab ➤ Draw panel ➤ Line.
- Drag the mouse down to the empty drawing. Click to specify the first point of the line.
- Drag the cursor in any direction and click to pick the next point of the line.
- Continue dragging and clicking to create a few more lines.
- Right after you pick the last point, without moving the mouse, use the keyboard to type close. As you type the close command, it appears in a small text box in the window.

- Press the Enter key on your keyboard to complete the close command. The end of the last line you drew is connected to the beginning of your first line. This method of directly entering a command into the window is called dynamic input. It is faster and easier than using the command line.

- Before moving on to the next lesson, click ➤ Close to close your drawing. You do not need to save it.
TERIMA KASIH ATAS KUNJUNGAN SAUDARA
Judul: Getting Started with the Basics in AutoCAD
Ditulis oleh Iyan Supriyadi
Rating Blog 5 dari 5
Semoga artikel ini bermanfaat bagi saudara. Jika ingin mengutip, baik itu sebagian atau keseluruhan dari isi artikel ini harap menyertakan link dofollow ke https://teknikautocad.blogspot.com/2013/03/getting-started-with-basics-in-autocad.html. Terima kasih sudah singgah membaca artikel ini.Ditulis oleh Iyan Supriyadi
Rating Blog 5 dari 5
Categories:
Tutorial


0 komentar:
Posting Komentar